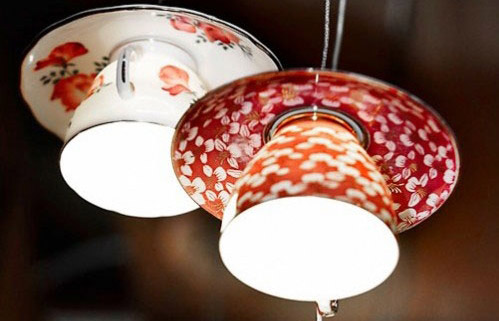
I grew up in a tea-drinking family and I have always loved the delicacy of teacups. If you have some you particularly like, turn them into these gorgeous teacup lights. It’s not as difficult as you may think and it should only take you about an hour to create these cute little lamps which are just my cup of tea. They also make really great gifts.
What you need
• Cup and saucer
• Pencil
• 1/2-inch diamond hole saw drill bit Upcycling ideas teacup lamp
• Drill
• Chandelier light fitting
• 1/2-inch steel threaded lamp nipple with matching nut
• Wire
• Plug
• Screw driver
• Wire cutters
• Gloves and safety glasses
Turn your cup and saucer over and mark the center with a pencil. Put on the gloves and safety glasses before using the drill. Pour a little water over the bottom of the cup and place the drill bit on your pencil mark at a 45 degree angle. Slowly start to drill into the bottom. Drill slowly and don’t apply too much pressure until you have a hole in the bottom of your cup. Now do the same with the saucer.
This is the kind of 1/2-inch diamond hole saw drill bit I use:

Put the cup and saucer together and slide the steel threaded lamp nipple through them. Use the wire cutters to cut a length of wire and feed it through the steel threaded lamp nipple. Split the wire and strip 1/2 inch of plastic coating off the ends of the wire that are on the inside of the cup. Use the screw driver to loosen the screws on both sides of the chandelier fitting. Wind one wire around each screw and tighten. You can put either wire on either screw. Try to find a light socket that will accept the same thread size and pitch as the threaded lamp nipple, and screw the lamp socket on to one end, the end inside the tea cup.
This is the kind of steel threaded lamp nipple I use:

This is the kind of chandelier fitting I use:

Pass the nut over the other end of the wire and screw it down onto the exposed threaded pipe at the bottom of the saucer. Tighten until the whole lamp fitting is secured. Strip 1/2 inch of rubber shielding off the two loose ends of the wire. Use the screwdriver to loosen the screws on the plug and open it up. Loosen the screws inside the plug. Wrap one wire (either one) around each screw and then tighten. Put the plastic cover back on the plug and tighten the screws.
Screw a bulb into the chandelier light fixture, plug in your light and voila! Great idea!
Like this DIY? Buy the book! Greenmoxie’s Guide to Green Living contains over 80 DIYs, recipes and tips on how to live greener and leaner. Learn to make fun upcycling crafts and furniture, make your own cleaning products, grow your own food and make all your own beauty products from face creams to mascara.


